My two little boys are in their playroom setting the table and pretending to make food. I just overheard Curious George say to Happy Dancer, "I'm scooping your cod liver oil." Wow, how our diet has changed!
Since we are drinking raw milk without added Vitamin D, we needed another source of Vitamin D in our diet. The Weston A. Price Foundation describes cod liver oil as "our most important superfood." Their website has detailed information about the importance of cod liver oil, and they have recommendations for the best brands.
Every day we take our butter oil/fermented cod liver oil from Green Pasture. We began with the Chocolate cream, and the combination of chocolate and fish was initially gag-inducing. My husband couldn't stand it, so he switched to the capsules. Since our little boys can't take a capsule yet, we had to find a way to tolerate the smell and taste. I discovered that if I coated the spoonful of cod liver oil with applesauce, I could swallow without wanting to lose my lunch. Amazingly, my palate has really changed over the last 6 months, and now I don't really need the applesauce. I don't even smell the fishy aroma anymore. For variety, we tried Green Pasture's Cinnamon Tingle flavor of cod liver oil. They aren't kidding about the "tingle" part. The tingle was so strong that it made Happy Dancer cry. We had to separate his 1/2 tsp. serving over several bites with lots of applesauce. Now we are back to the Chocolate Cream flavor, and everyone happily takes their cod liver oil every night.
Friday, May 11, 2012
Saturday, May 5, 2012
Heart Surgeon Speaks Out On What Really Causes Heart Disease
My grandma and two of my uncles died from heart disease. I'm praying that the changes we are making to our diet will stop the pattern of people dying too young in our family.
Heart Surgeon Speaks Out On What Really Causes Heart Disease -- Health & Wellness -- Sott.net: http://www.sott.net/articles/show/242516-Heart-Surgeon-Speaks-Out-On-What-Really-Causes-Heart-Disease
Heart Surgeon Speaks Out On What Really Causes Heart Disease -- Health & Wellness -- Sott.net: http://www.sott.net/articles/show/242516-Heart-Surgeon-Speaks-Out-On-What-Really-Causes-Heart-Disease
Tuesday, April 10, 2012
Pumpkin Chip Muffins: A recipe in progress
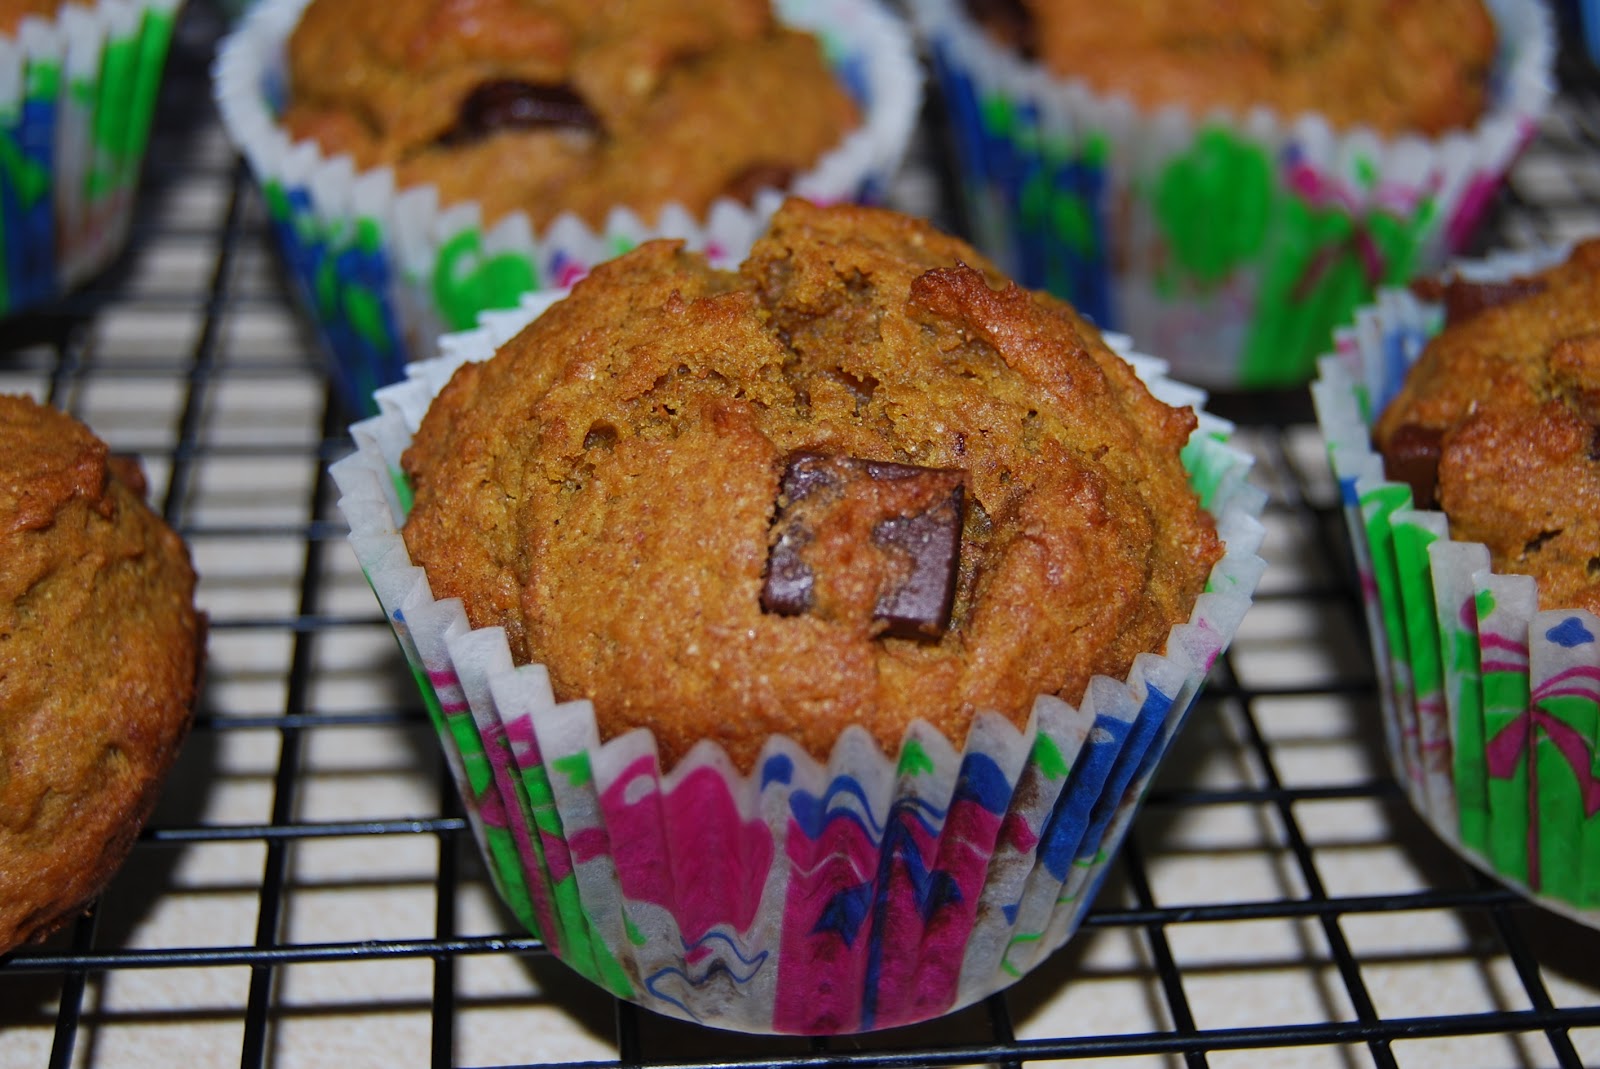
Pumpkin Chip Muffins get a healthier make-over.
Pumpkin and chocolate are such a great combination, and I was thrilled when I found a delicious recipe for pumpkin chip muffins from www.tasteofhome.com. My boys devoured these sweet muffins. As I progressed in our real food journey, I loved the flavor of these muffins, but I hated the 2 cups of refined sugar and 3 cups of white flour. I started substituting better ingredients as I learned more and acquired the healthier ingredients. I started with fifty percent white flour and fifty percent whole wheat flour. I recently tried a new grain-freee pumpkin chip recipe with coconut flour, but my dear hubby was not a fan. Now I use a mixture of whole wheat flour and sprouted wheat flour. Some day I hope to be only using sprouted wheat, but I haven't experimented with that yet. I tried a few different brands of stevia for a portion of the sugar, but I thought they had a strange aftertaste. Then I moved to maple syrup and maple sugar. I've cut the amount of sugar in half, and now I use sucanat. Coconut oil is substituted for the canola oil. The muffins aren't quite as sweet with the current recipe, but they are still delicious, and all my guys gave them the seal of approval. They are an easy, portable breakfast for my husband who grabs breakfast to go.
My Ingredients

Expeller-pressed coconut oil

Pastured eggs, organic pumpkin, and sucanat


Homemade Baking Power- I found the simple recipe here.
Prep: 10 min. Bake: 15 min. + cooling Yield: 27 servings
Ingredients
- 4 pastured eggs
- 1 cup sucanat (rapadura, maple syrup, or other healthy sweetener)
- 1 can (15 oz.) solid-pack pumpkin
- 1 - 1/2 cups expeller-pressed coconut oil
- 1 - 1/2 cups white whole wheat flour
- 1 - 1/2 cups sprouted whole wheat flour
- 2 teaspoons baking soda
- 1 teaspoon baking powder
- 1 teaspoon ground cinnamon
- 1/2 teaspoon sea salt
- 2 cups or 10 oz. of semisweet chocolate chips (I used Enjoy Life brand.)


The cookie scoop makes filling the muffins neat and easy.
Directions
1. Preheat oven to 400 degrees.
2. Pull eggs out of refrigerator. Melt coconut oil in small pan on low heat. In a large bowl, beat the eggs, sucanat, pumpkin, and oil until smooth.
3. In a medium bowl, combine the flours, baking soda, baking powder, cinnamon, and salt.
4. Gradually add dry ingredients to pumpkin mixture and mix well.
5. Fold in chocolate chips.
6. Fill greased or paper-lined muffin cups three-fourths full.
7. Bake at 400 degrees for 15-18 minutes or until a toothpick inserted near the center comes out clean.
8. Cool in pan for 10 minutes before removing to a wire rack.
Yield: About 27 muffins

Mmm, now I want to make some more.
This post is linked back to Sunday School at Butter Believer and Monday Mania at the Healthy Home Economist.
Sunday, April 1, 2012
Raw milk to go
We recently spent a wonderful, sunny week in Florida, and as I planned for the trip, I realized that our real food diet wouldn't be easy while we traveled. If I truly value this healthy food, then why would I give my family fast food and junk for a week if I have the ability to plan ahead and I have access to a full kitchen at my destination? I challenged myself to research and think ahead so that we could continue with healthy foods as much as possible. A few problems presented themselves quickly.
- Locating real food: I've spent months figuring out how to find the most affordable sources for raw milk, grass-fed or pastured meats, and organic fruits and vegetables in my own area. How can I find raw milk in another state?
- Transporting: Real food is often very perishable. What foods should I try to bring in my luggage on an airplane, and what should I buy at my destination?
- Ingredients: Many of my real food recipes call for ingredients that I've prepared ahead (chicken stock, roasted chicken, soaked and dehydrated nuts, etc.) What recipes could I make at the hotel that don't require other steps to prepare the ingredients?
- Snacks: I don't buy many snack foods for our regular routine at home, but I knew we would be spending a lot of time traveling or standing in lines. I wanted to be prepared with healthier snack options for my little boys to keep up moral and avoid meltdowns. What are the healthiest, portable, non-perishable snack options for little ones?
- Planning for our return: I usually pick up my raw milk, cheese, cream, and meats every two weeks. Our trip fell on my normal pick-up week, so upon our return we wouldn't have access to our normal source of real food for at least a week. Where could I find another source of raw milk in my area to fill in the gap?
As you can imagine, it took some work thinking through all these questions. I'll tackle these in a few different posts, and today I'll focus on the search for raw milk. First, I headed to www.realmilk.com, and I looked up Florida. I learned that Florida only allows people to sell raw milk for "pet consumption only." There are many different raw milk sources listed, and they are listed by town or county. We were heading to Orlando, and then we were taking a day trip to Clearwater early in the week. I ruled out the only source in Orlando very quickly. It's a co-op that ships their food from a farm in PA every two weeks. Wow, I was shocked at the prices! I guess it is really expensive to send the food that far, and I had a new-found gratitude for my home state. I wish the sources on the real milk site were organized on a state map because I don't know Florida well, and I was trying to figure out what towns and counties were close to Orlando or our travel route. I decided to focus on Tampa because we were going to drive through. I sent an email to Sarah from the Healthy Home Economist blog, and she sent me a list of natural food stores that sell raw milk in the Tampa area. Tampa is an hour and a half away from Orlando, so I had to plan a way to keep the milk cold during the trip. A soft, collapsible cooler from Trader Joe's and a blue ice fit the bill, and I packed them in my luggage for the trip.

We flew down to Orlando on a Saturday morning, but we weren't going to be in Tampa until Monday night. My family can finish a gallon of milk in two days, so I needed a temporary solution to get us to Monday. I remembered reading that people can bring milk on an airplane if they have a small child. I bought two Thermos before the trip, and I filled them with raw milk before we left. The milk lasted until we reached Orlando, so we didn't have to get the ultra-pasteurized milk in the airport. Score 1 for planning ahead!

On Saturday night, I shopped for groceries at Whole Food's in Orlando, and I was excited to find some non-homogenized milk from grass-fed cows. I bought enough to last us until Monday. I filled our Thermos again for our day trip to Clearwater. As we drove back through Tampa, I called the natural foods store closest to the highway to check if they had raw milk in stock. We drove 20 minutes away from the highway, and I kept trying to assure myself that all this effort was worth it. The store only had 4 half-gallons of milk, so we bought all of them. Each half gallon cost more than a whole gallon from my local farmer in PA. I don't think we could afford to buy raw milk regularly if we lived in Florida. I know they have some direct buying clubs, so maybe the milk is more affordable if you get it from the farmer. We packed the milk in our cooler and headed back to the hotel. I was so proud of myself for finding raw milk in another state.
 My boys went through the first half-gallon by Wednesday. I opened the second one, and there was so much cream on top that I couldn't seem to get the milk to pour out into my son's cup. I shook the container, and then tried again. The milk seemed lumpy, but I chalked it up to cream. At dinner, my son refused to drink the milk. I assured him it was just full of cream, but when I tasted the milk I realized there was a problem. The milk was sour. :-( I felt sick pouring the whole half-gallon down the drain. When I opened the next two, they were also sour. Ugg. Fail. Three half-gallons of milk down the drain. (ETA: Further proof of my newbie status- Sarah just posted a long list of things to do with sour raw milk. Since we were vacationing, I didn't have many options, but if I have raw milk at home, I'll know what to do now.) My friend, who was vacationing with us, graciously offered my boys her skim milk. While I appreciated the offer, skim milk was not what I was working towards. On Thursday night, I sent my husband back to Whole Food's for the non-homogenized milk.

I called the natural foods store, and I asked for a refund. They asked if I bought from the direct buying club or if the milk was the left-overs off the shelves. Then the store employee asked me to bring the containers in. When I explained the situation, they were willing to give me a refund over the phone. I appreciated the refund, but I was so disappointed that all the planning and extra driving had resulted in my kids drinking pasteurized skim milk. The containers didn't have a "best by" date, and my guess is that people don't buy this expensive milk in the store very often. More reasons to buy directly from the farmer if you can. My guess is that if raw milk was legal for human consumption in Florida, they would have to print a date on the bottle. If it was legal, then I could probably have found the milk in a closer store. Oh, to have raw milk vending machines like they do in Europe! I'm going to keep looking for raw milk when we travel, but I'm going to be suspicious of containers without dates if I can't ask the farmer when the milk was produced and bottled.
When we got home, I visited my local sparkly, new Whole Food's store for the first time. I was disappointed to see that they don't carry raw milk or non-homogenized milk. I needed milk to fill in the gap until I could pick it up from my farmer. I remembered that Martindale's, my local health food store, stocks raw milk, and I was surprised how affordable it was compared to Florida. Two gallons of delicious raw milk (with dates!) from my local store made me happy to be home.
This post is linked back to Sunday School at Butter Believer.
Monday, March 26, 2012
Welcome Spring: Sunny Day Chicken Curry

Curious George asked for a yellow daffodil for his room, and he inspired me to make a bouquet of flowers from our yard. Daffodils, forsythia, tulips, and hyacinth are blooming, and the warm sunshine is calling us outside. I'm realizing how much yard work needs to get done, and I'd rather be working outside than in the kitchen today. I'm grateful for left-over chicken curry in the freezer. I moved it into the refrigerator to defrost this morning, and it will be an easy dinner tonight. I did some batch cooking in February, and now it will pay off. All I have to do is heat up the curry and toast some coconut to sprinkle on top. The chicken curry is a delicious way to use my roast chicken and chicken broth.

Thursday, March 15, 2012
The Chicken Roast-off
My mom is an amazing cook, and she's always willing to try a new recipe. When I was growing up, my parents begged me to learn how to cook with my mom. Unfortunately, I was always too busy and uninterested. When I was in college, I got my first apartment with my friends, and I needed to do some basic cooking. I emptied a bag of rice into a cute jar, and then I threw the bag away. When I needed to cook rice with a meal, I sheepishly called my mom and asked, "How do you cook rice?" (Obviously, those were pre-Google days.) My cooking skills grew with practice, but I was still intimidated by large cuts of meat. I didn't know any recipes for them, and I wasn't sure what to do with the extra meat after the meal.
In 2008, I read an article in Guideposts Magazine about a young woman who used her grandmother's recipe to roast a whole chicken. I was very impressed, and I thought the recipe didn't look too hard. I acquired my first whole chicken, and I set about washing the bird and trying to get out the innards. My only problem was that I only noticed an opening on one end of the bird. The opening was so small that I could only get one finger in. How was I supposed to get the innards out? I tried as hard as I could, but I kept thinking, "There must be a better way to do this." How I laughed at myself when I realized a flap of skin was covering the larger opening! Chicken lesson #1: There are two openings in a chicken, and only one is big enough for the giblets. To my shame, I still didn't now what to do with the giblets, so I just threw them away.
I was watching Oprah one afternoon, and a chef named Cristina Ferrare was talking about roasted chicken. She suggested roasting two at once, and then you can dice up the chicken to use in other recipes. I started storing and freezing two cup portions of roasted chicken, and I tried them in several of her recipes. I haven't adapted the recipes for traditional cooking yet, but her pesto chicken recipe is one of my favorite ways to use homemade pesto.
When I entered Nourishing Traditions land, I realized that how the chicken is raised is important, and you can make wonderful, healthy chicken stock from the innards and bones. (I'll do a future post on making stock). I started buying pastured chickens from www.yourfamilycow.com, and then I roasted two birds at once, saved the extra meat for other meals, and then made broth with the bones. Unfortunately, my regular chicken supplier has run out for this season, and I'm looking for other sources of organic chickens. Out of convenience, I bought two "organic, free-range" chickens from Trader Joe's, and I was really disappointed when I read the fine print at home. The chickens are fed corn and soy, so I'll keep looking for another chicken supplier.
This week I found the Nourishing Traditions recipe for Roast Chicken. I decided to try it with one chicken, and then compare it to a chicken with my usual recipe called "Mo's Sunday Roast Chicken." I had some left-over gravy in the freezer, so I didn't try the gravy portion of the recipe. Here are the results of my chicken roast-off.

Nourishing Traditions' Roast Chicken
The Nourishing Tradition's chicken was moist with great crunchy skin. I've never turned a chicken over half-way through cooking, and it really did make a difference. The caramelized onions on the bottom of the pan were amazing and flavorful. My family does not prefer large amounts of garlic, so I only added one head of garlic instead of two. I didn't peel the garlic, and I wish I had. The peels were slimy, and it wasn't always easy to pop out the cloves. If I make this recipe again, I'll probably just add a few peeled or chopped cloves. The meat was tender, but I didn't think it had much flavor.

Mo's Sunday Roast Chicken
The chicken with my regular recipe is moist and the skin has delicious flavors from lemon and Herbes de Provence. The skin on the top is crunchy, but the skin on the bottom of the bird is wet and limp. I think I'll try turning over the bird the next time. I love the roasted sweetness and zesty flavors in the potatoes, celery, onions, and carrots.
Bottom Line: Even though the Nourishing Tradition's chicken was crispy and the onions were incredible, I'm planning on sticking with my regular recipe in the future. I love the Herbes de Provence and lemon flavors in the skin and vegetables.
Mo's Sunday Roast Chicken
Ingredients:
- 1 large fryer chicken, 4-5 lbs.
- 1 Tblsp. Herbes de Provence
- 2 garlic cloves, minced
- 1 lemon
- 1/2 c. olive oil (I used grass-fed butter)
- 1 teaspoon salt (I used 3/4 tsp. sea salt)
- 1 teaspoon pepper
- 5 carrots, cut in half
- 6-8 red potatoes
- 1 onion, cut in eighths
- 5 stalks celery, cut in half
Directions:
Preheat oven to 425 degrees F. Wash chicken; remove innards. Pat dry inside and out. Mix herbs, garlic, juice of 1/2 lemon, oil, salt and pepper in a large bowl. Rub chicken inside with remaining half of lemon and sprinkling of salt and pepper. Rub chicken outside with some of the herb-lemon-oil mixture. Place chicken in a large roasting pan. Truss the bird, or just tie the legs with kitchen twine. Toss vegetables in remaining herb-lemon-oil mixture. Set aside to marinate. Roast chicken for 20 minutes. Remove vegetables from marinade and add to roasting pan. Continue to roast chicken with vegetables for about one hour, or until done. Baste with pan juices every 20 minutes.
From Guideposts Magazine, October 2008, page 22.
Thursday, March 8, 2012
Slow Food at its Most Awesome Yumminess
Blood Orange Beef Stew with Butternut Squash

For someone new to traditional foods, I faced a bit of a sticker shock when I started buying organic vegetables and grass-fed meats. Of course they are healthier, but wow, how they've changed our monthly food budget. One of my strategies for stretching our dollars is buying the least expensive cuts of meat. I've been roasting whole chickens and trying to find good ways to prepare stew meat and chuck roasts.
I've made beef stew two other times this winter, and I was disappointed both times. I attempted the Nourishing Traditions recipe for All-day Beef Stew, but I had to make so many changes that I didn't give it a fair try. Instead of marinating the meat overnight, I only had time to marinate it in red wine for a couple of hours. I still need to get a cast iron dutch oven, and I tried to use my crock pot instead. I didn't have time to get the food in the crock-pot until lunch time, so I had to cook it on high. The recipe says to add the vegetables for the last hour. This is not true for a crock pot! The vegetables were still hard after 2 hours. Dinner ended up delayed...again. The stew had good flavor, but the meat was not very tender.
Since stew meat is affordable, I was determined to find a recipe that worked. I was going to try the All-day stew recipe again, and I even remembered to put the meat in the fridge to thaw a few days ago. Yesterday I was on Pinterest, and I noticed a recipe for blood orange beef stew with butternut squash. Pinterest did not steer me wrong! I've never had blood oranges before, and I'm in love with the color. The juice is a beautiful dark magenta. I used two ceramic casserole dishes with lids, and it worked perfectly. The meat is fall apart tender, and the vegetables were very soft. I loved expanding beyond the traditional winter vegetables of potatoes, carrots, and celery. Curious George said it was, "spicy," and I loved the balanced combinations of flavors--not too sweet, citrusy, or spicy. My littlest one summed it up by saying, "Nummy!"
The only downside of this recipe is that it is SLOW food. I started around two in the afternoon, and we didn't sit down to eat until 8pm. (I did feed the little ones a big snack at 5 to prevent a mutiny.) My goal was to get the stew in the oven by 3:30pm, and it took me another hour and a half. It was a gorgeous spring day, and we didn't get outside to play until dusk. I did cook three pounds of meat, and the recipe only calls for two, so that took longer to prepare. Still, grating orange peels, juicing oranges, and searing the meat takes a long time. I'm so glad the amazing flavor made it worth it. I'm also excited to have enough left-over to freeze for another meal.


Recipe from ciaoflorentina.com
Blood Orange Beef Stew with Butternut Squash Recipe
( serves 4 )
( serves 4 )
- 1/4 c olive oil
- 1 small onion -diced
- 5 large garlic cloves -whole
- 2 lb organic Chuck Roast -cut into 1 1/2 inch cubes
- 2 lb organic Butternut Squash cut into 1 1/2 inch cubes
- 4 blood oranges
- 1 large carrot or 2 smaller ones -sliced into 1/2 inch rounds
- 6 thyme sprigs
- 1/4 tsp red pepper flakes + more to taste
- 3 whole cloves
- 1 tsp sea salt
- 1/4 tsp black pepper -freshly grated
- 1 1/2 tbs balsamic vinegar
- 2 bay leaves
- nut meg -freshly grated
- 1/4 c Italian parsley -chopped
- 3 tbs all purpose flour
- 3/4 tsp sweet paprika
- 3 cups water -filtered
1. Mix the flour and paprika together in a plastic bag. Season the beef with the sea salt and black pepper and transfer them to the plastic bag. Toss everything together to coat.
2. Heat up 2 tablespoons of the olive oil in a cast iron dutch oven over medium flame. Add the garlic cloves and sear until golden on both sides. Transfer to a bowl. Shake any excess flour from the beef and sear each cube for a couple of minutes until golden brown at the edges. Work in batches so you don’t overcrowd the pot and add 1 tablespoon of olive oil in between batches if necessary. Transfer them all to the bowl with the garlic and cover with plastic wrap to keep warm.
3. Add one more tablespoon of olive oil to the pot and saute the onion with a pinch of sea salt until translucent. Add the red pepper flakes and cook one more minute.
4. Meanwhile save two strips of orange peel from the blood oranges and zest the rest and reserve. Squeeze 1 cup of juice from the oranges and add it to the pot together with the balsamic vinegar. Using a silicone spatula make sure to scrape all the brown bits from the bottom. Add the bay leaf, cloves, thyme sprigs and orange peels and allow to simmer for 3 minutes.
5. Add the beef cubes with all the juices and the garlic back to the pot and stir to combine. Add the water and bring to a simmer. Cover with a tight lid and transfer to a 350 F degrees oven. Let it cook for 2 hours.
6. Add the butternut squash and carrots to the pot, give it a good stir, cover tightly with the lid and let cook in the oven for an additional 45 minutes or until the meat and vegetables are tender.
Discard the bay leaf and thyme sprigs and gently stir in 1/2 teaspoon of the reserved orange zest. Serve hot sprinkled with the parsley and a pinch of freshly grated nutmeg and bruschetta.
Discard the bay leaf and thyme sprigs and gently stir in 1/2 teaspoon of the reserved orange zest. Serve hot sprinkled with the parsley and a pinch of freshly grated nutmeg and bruschetta.
Tip: Use chuck roast whenever making beef stew, it is one of the most flavorful cuts and the best for cooking slowly in some liquid.
Monday, March 5, 2012

What is a healthy diet?
I just found a great article on a website called The Nourishing Cook. She has a summary of the Weston A. Price Foundation's recommendations for a healthy diet. I learned a lot reading through the list, and I was surprised by the last item about not using a microwave. News to me. I've still got a long way to go before our diet lines up with all these guidelines. There is also a great discussion that helps to clear up confusion about healthy fats. This article is an informative introduction to traditional cooking.
Third Time's a Charm

What could be easier than a basic pot roast, right? Unfortunately, I've had some disappointing pot roast meals, but I think I've found a winning recipe now. The first time I tried cooking a pot roast, I was looking for a recipe I could use that day. I didn't have time to marinate the meat for days, so I settled on a recipe for grass-fed beef that cooked a 3-5 pound roast for a 2.5 hours in a cast iron dutch oven. Only problems were that my roast was only 2 pounds and I didn't have a cast iron dutch oven. I decided to use my largest pot and put aluminum foil over it. After cooking the roast, I was going to use the liquid in the pan to make yorkshire pudding and gravy. Epic fail. I checked the meat after 2 hours, and the meat was dried out and the liquid was gone. There went my plans for the rest of the meal.
The second time I tried a pot roast, I decided to use my crock pot. I found a recipe for regular beef in one of my crock pot recipe books. At least this meal was edible, but the beef was tough and didn't have much flavor.
For my third attempt, I gave myself plenty of time, and I found the Nourishing Traditions recipe for Pot Roast on www.food.com. Miracle of all miracles, I remembered to pull the meat out in time to thaw and then marinate for 2 days. I think I'll try 3 days in the buttermilk next time and see if that makes it even more tender. I watched a YouTube video on searing meat, and I used my large pot to sear the meat and heat the cooking liquid. Then I transferred the meat and liquid to my ceramic dutch oven with a lid. The meat was still a little tough, but it had good flavor, the vegetables were tender, and there was plenty of liquid in the pot to make the yorkshire pudding and gravy. Success!
Sally Fallon's Pot Roast - serves 6-8
Ingredients
3 lbs rump roast (chuck roast or other cut suitable for pot roast is okay)
1 qt. buttermilk
2 Tblsp. butter
2 Tblsp. extra virgin olive oil
1 cup red wine
2 cups beef stock
3 springs French tarragon, tied together (subbed for fresh thyme)
1/2 tsp. green peppercorns, crushed or 1/2 tsp. black peppercorns, crushed, placed in tea infuser
1 dozen small red potatoes, unpeeled, left whole
1 lb. carrots, peeled and cut into chunks
2 Tblsp. arrowroot
2 Tblsp. filtered water
salt, to taste
black pepper, to taste
Directions:
1. Pot roast: Use a metal skewer to poke the meat all over.
2. Place the meat in a bowl or glass loaf pan that is just large enough to fit it. Pour the buttermilk over the meat.
3. Allow to marinate in the refrigerator, for 2-3 days, stirring occasionally.
4. Remove the meat from the buttermilk (discard buttermilk) and dry off with clean lint-free towel.
5. On med. heat, sear the meat on all sides in a Dutch oven in the butter and olive oil.
6. Preheat oven to 300 degrees.
7. Remove meat to platter; pour out the browning fat and discard.
8. Next, add the red wine, stock, French tarragon and peppercorns to the pot. Bring to boil and skim off the top.
9. Return the meat to the pot and bake, covered, for 3 hours or until tender. One hour before serving, add the potatoes and carrots.
10. Gravy: Transfer the meat and vegetables to a platter and bring the sauce to a boil on the stove top.
11. Spoonful by spoonful, add the arrowroot and water and whisk in the pot to make a gravy of desired thickness. Season with salt and pepper and serve with the pot roast.

Pot roast, carrots, potatoes, and yorkshire pudding with gravy
Preheat oven to 400 degrees. Place muffin pan into oven and heat until drippings are boiling. Meanwhile, place in medium mixing bowl:
1 1/2 C. flour (I used 1/2 cup whole wheat and 1 cup sprouted whole wheat)
1 1/2 tsp sea salt
1 cup milk
4 large eggs
1 cup water
1 1/2 tsp sea salt
1 cup milk
4 large eggs
1 cup water
Beat well. Remove muffin tin from oven. While still hot, fill cups with batter and quickly return to oven. Bake for 20 minutes. Reduce heat to 350 and bake 10 minutes longer until puffy and golden brown. Serve immediately.
After the meal I saved the marrow and the bone for my next beef stock. I've read somewhere that people eat marrow on toast. That sounds a little gross and strange to me, but I'll keep reading and keep you posted when I figure out what to do with marrow.
After the meal I saved the marrow and the bone for my next beef stock. I've read somewhere that people eat marrow on toast. That sounds a little gross and strange to me, but I'll keep reading and keep you posted when I figure out what to do with marrow.
- .
Wednesday, February 29, 2012
Spring time grilling
This winter has been amazingly mild, and we've had temperatures in the 40s and 50s on most days. I've loved being able to take my two little ones outside for fresh air and exercise. This past Friday I saw my first daffodil of the year, and on Monday the temperature even climbed to 60 degrees. I decided it was high time we started using our grill again.
 I had ordered some grass-fed hamburgers from our farmer last week, and I even remembered to pull them out on Sunday to begin thawing. The first time I cooked grass-fed hamburgers, I used our George Foreman grill, and I think I over-cooked the meat. They were rather hard and bland. This time I decided to do a little research before we grilled. I found a website with detailed instructions about how to grill grass-fed hamburgers. We grilled some sourdough bread for buns, and we added some raw milk Cheddar cheese. They smelled incredible when they were cooking, and they tasted juicy and flavorful. We added some grilled onions, mixed greens, ketchup, and mustard to the burgers. I haven't figured out how to make my own condiments yet, so that's a skill for the future.
Now on to the sides. I read on a blog that beef tallow can be used to make french fries, and I thought that would be a fun side for the burgers. I saved beef tallow from the last time I made beef stock, but it's only a few Tablespoons of tallow. When I looked up the recipe for french fries, I realized I needed 6-8 cups of tallow! Other than when you make stock, how do people get that much tallow? So that recipe was a bust. It did inspire some new items for my wish list: a french fry cutter, deep-fat fryer, a whole bunch of tallow.
Since I still don't have my own copy of "Nourishing Traditions", I googled "nourishing traditions potato wedges." I didn't find any potato recipes that looked promising for dinner, so I tried www.tasteofhome.com, my former go-to site for recipes. I found a recipe for "Two-tone Potato Wedges," and I changed it a little based on what I've learned about traditional foods. In my teleconference with KerryAnn, she said that we shouldn't heat olive oil, so I substituted grass-fed butter. I also substituted sea salt for regular salt.
Here's the recipe for my version of Two-tone Potato Wedges
Prep: 10 min. Bake: 45 min. Yield: 5 servings
Ingredients:
- 3 medium organic potatoes
-2 medium sweet potatoes
-2 Tblsp grass-fed butter, melted
-1/4 tsp. sea salt
-1/4 tsp. pepper
1.5 Tblsp grated parmesan cheese
2 garlic cloves, minced
Directions:
- Cut each potato into eight wedges; place in a large resealable plastic bag. Add the butter, salt and pepper; seal bag and shake to coat. Arrange in a single layer in a 15-in. x 10-in. x 1-in. greased baking pan.
-Bake, uncovered at 425 degrees for 20 min. Turn potatoes; sprinkle with cheese and garlic. Bake 20-25 min. longer or until golden brown, turning once. Yield: 5 servings.

I also cooked some organic green beans with melted butter and basil as a second side. Along with our kefir and mixed berry smoothies, we had a yummy weeknight dinner. Bring on grilling season!
Sunday, February 26, 2012
The breakfast dilemma
When I started reading articles about traditional foods, one of the first things I started changing was our breakfast foods. We typically ate whole grain cereals, breakfast bars, non-fat yogurts, oatmeal, or bagels for breakfast. I thought that as long as the food had "whole grains" then we were eating healthy food. During my brief foray into low-carb dieting, I started eating more eggs, breakfast meats, and yogurt.
I was really discouraged to read an article about the dangers of breakfast cereal. I would still love to see more studies about extrusion and puffed grains, but until I see more evidence that they are safe, we've fazed out cereal in our house. It was not easy to give up because Curious George, my three year old, loved cereal, and I loved having an easy breakfast option. As he finished eating each box, I didn't replace it, and when he asked for cereal, I could just say that we ran out. He only asked me to buy more cereal a few times before he stopped asking for it.
So what's for breakfast now? I usually make scrambled eggs from pastured hens with raw milk cheese. My boys are starting to get tired of them, so they only eat them a few days each week. Then we have homemade waffles, toast, or oatmeal. We use sprouted wheat in our waffles and pancakes, and I've found sprouted wheat bread and sour dough bread from Trader Joe's. I know that I need to soak my oatmeal, but I just haven't gotten there yet. I recently found a family favorite in a recipe from Kelly the Kitchen Kop. I've made it twice now, and Curious George asked me for it again. I just started soaking the oatmeal tonight, and we'll enjoy the Baked Soaked Oatmeal all week.

Here is the recipe for Kelly's Baked Soaked Oatmeal

I was really discouraged to read an article about the dangers of breakfast cereal. I would still love to see more studies about extrusion and puffed grains, but until I see more evidence that they are safe, we've fazed out cereal in our house. It was not easy to give up because Curious George, my three year old, loved cereal, and I loved having an easy breakfast option. As he finished eating each box, I didn't replace it, and when he asked for cereal, I could just say that we ran out. He only asked me to buy more cereal a few times before he stopped asking for it.
So what's for breakfast now? I usually make scrambled eggs from pastured hens with raw milk cheese. My boys are starting to get tired of them, so they only eat them a few days each week. Then we have homemade waffles, toast, or oatmeal. We use sprouted wheat in our waffles and pancakes, and I've found sprouted wheat bread and sour dough bread from Trader Joe's. I know that I need to soak my oatmeal, but I just haven't gotten there yet. I recently found a family favorite in a recipe from Kelly the Kitchen Kop. I've made it twice now, and Curious George asked me for it again. I just started soaking the oatmeal tonight, and we'll enjoy the Baked Soaked Oatmeal all week.

I started soaking my oatmeal in buttermilk tonight, and I'll bake it tomorrow night.
Here is the recipe for Kelly's Baked Soaked Oatmeal
- 2-1/2 c. oats (steel cut or regular, but I like regular best)
- 1 T. whole wheat flour (provides phytase to help break down the phytic acid in the oats)
- 1-3/4 c. buttermilk (In place of buttermilk or yogurt or kefir for soaking, you can use 1 tablespoon of whey, lemon juice or vinegar to 1 cup of liquid – usually water for those who can’t have dairy, but milk would be fine, too.)
- ½ c. coconut oil
- 4 eggs (preferably from pastured hens!)
- ½ c. sugar, maple syrup or honey
- 1 tsp. Baking powder (many have said they leave this out and it’s still really good)
- ½ tsp. sea salt
- 2 tsp. Cinnamon
- 2 tsp. Vanilla
- 2 c. raisins
- 2 c. chopped apples or pears or other fruit of choice
- Optional: 2 c. chopped nuts (or sprinkle on each individual serving after baking
- Soak oats, flour and buttermilk covered on kitchen counter overnight, but 24 hours is better in order to break down more phytic acid. Before serving, beat oil, sugar, and eggs until glossy. Add baking powder, salt, cinnamon, and vanilla; beat. Stir in oats, raisins, and chopped apples (or pears). Sue said that she’ll sometimes add a little more milk at this point if the oats seem a little too dry. Pour into 9×13 baking dish and bake at 350 for 20-40 minutes, depending on your desired consistency.
- Note: You can also mix all the ingredients together ahead of time (wet ingredients first, add dry ingredients, then add the last 3 ingredients) and freeze until you’re ready to set on the counter for up to 24 hours and then bake. Or set it right into the oven with the automatic turn-on feature set so you can wake up to the smell of cinnamon in the morning and breakfast all ready to eat.
- One more thing: In case you’re wondering why the oats don’t need to be drained after soaking overnight, Jenny from Nourished Kitchen has this to say: “You don’t have to because phytic acid is degraded. It doesn’t leach into the water like oxalates.”
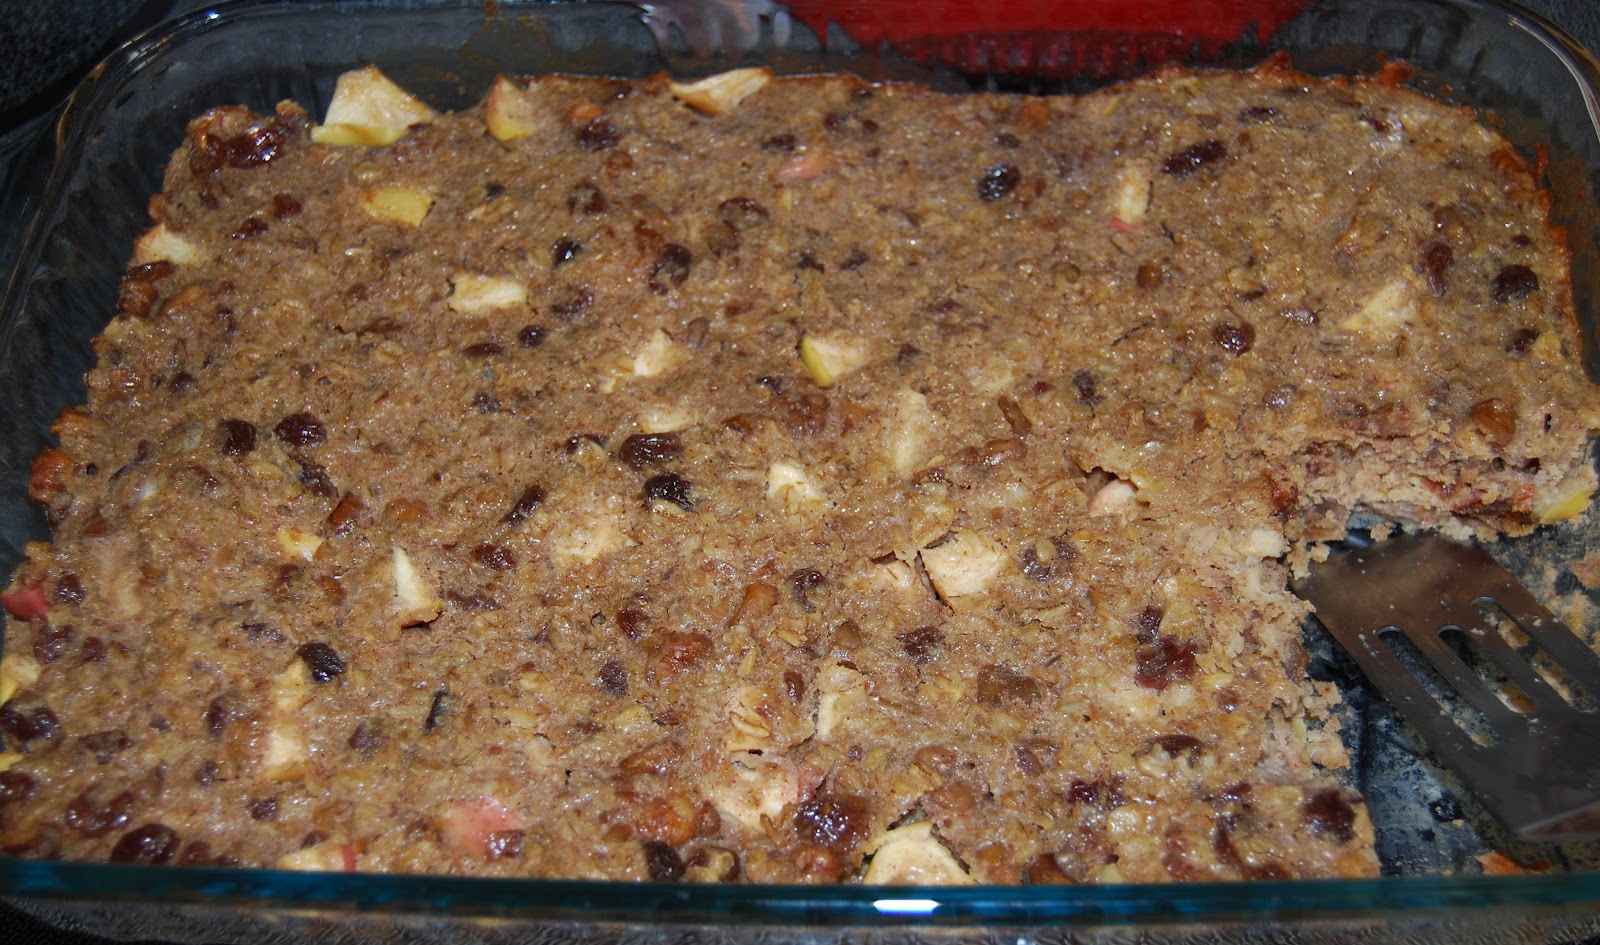
I couldn't get a picture before my husband cut some for breakfast. This is definitely a favorite in our house right now.
Wednesday, February 22, 2012
Starting the journey
This week I slowly turned the lid on the Mason jar, and Chinese 5-spice lacto-fermented apples started spraying across my kitchen. Hmmm, maybe this is what they meant about needing to "burp" the jars. And is it supposed to taste sour and bubbly when it's done, or did I "over-ferment?" Is "over-fermenting" even a possibility? Clearly, I'm new to this whole thing, and I've got a lot to learn in the area of traditional foods and cooking.
In an attempt to get a handle on this new skill, last Thursday I found myself on a teleconference with KerryAnn from Cooking Traditional Foods. Six months into this journey, and I was amazed at what I didn't know. It also made me think about how I got on this phone call in the first place.
I'm not a big joiner. Okay, my marriage and my church are big exceptions, but I generally don't like to join groups or jump on bandwagons. I don't go to the YMCA for exercise classes. I like my exercise videos in the privacy of my home. I read the books about how important breast-feeding is, and then when I hit huge problems in that area, I just fought through them. I didn't even think about joining a support group. I don't like any of the facebook status updates insisting that if I truly loved my husband, Savior, child, or mom, I would copy and paste this in my status immediately. I don't need a status update to prove my love, and I always ignore them. So how did I end up committing to the traditional foods bandwagon?
I was raised in skim milk and non-fat yogurt land. My mom has always tried to make us healthy food, and she was taught that fat is bad. We were served lots of whole grains, fruits, vegetables, and lean meats. I continued this style of cooking in my own home. My big problem was that the more non-fat yogurt I ate, the more weight I continued to gain.
Last winter I read an article in Reader's Digest about how I should be reducing carbohydrates and eating more eggs because fat doesn't make us fat. Yeah! Any reason to eat more bacon and eggs sounds good to me. Of course, not wanting to actually join anything, I read up on the Atkins diet online and made up my own meal plans based on their suggestions. I lost 10 pounds, and I was really proud of myself. I started buying Atkins meal replacement bars since they were sweet, and I missed sugar and carbs. We also joined a local CSA as a strategy for buying more local, organic produce.
All this time, I had this slightly annoying facebook friend that I describe as my "crunchy granola friend." She gets very passionate about topics, and then she's always posting articles on facebook. Sometimes I would get curious enough to read the articles, but they usually seemed off the deep end. One of her articles was on the dangers of Splenda. It caught my attention because Atkins uses Splenda as a sugar substitute, and I realized that my husband and I were consuming a fair amount of it. One article led to another, and it slowly started changing my thinking, shopping, and meal planning. I laughed at myself when I realized that I was actually making homemade soaked granola and sharing articles about the benefits of raw milk. I had become my friend.
So here I am. I haven't bought "Nourishing Traditions" yet or joined my local chapter of Weston A. Price, but I'm committed to this journey. I still need to lose weight, but this time I want it to be the right way. I know I have a lot more to learn, but I'm convinced that the health of my family is worth it.
I really should thank my "crunchy granola" friend.
Subscribe to:
Posts (Atom)